HW1 <<
Previous Next >> HW2
Tutorial1
https://cyberbotics.com/doc/guide/tutorial-1-your-first-simulation-in-webots
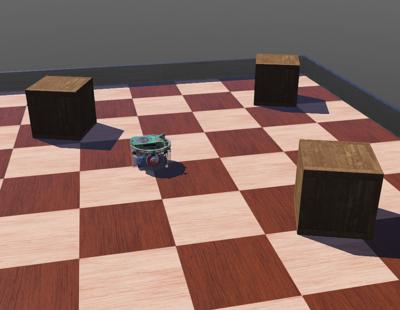
The objective of this first tutorial is to familiarize yourself with the user interface and with the basic concepts of Webots. You will create your first simulation containing a simple environment: an arena with floor and walls, a few boxes, an e-puck robot and a controller program that will make the robot move.
第一個教學導引的目的, 是讓使用者熟悉 Webots 的使用者介面與基本概念. 如下圖所示, 此導引所創建的模擬場景包含一個簡單的場景: 帶有地板與圍牆的競技場、幾個箱子、一個 e-puck 機器人和一個能控制機器人移動的程式.
Index
If not already done, download and install Webots, following these installation instructions.
Hands-on #1: Start Webots by double-clicking on its icon (or invoking it from a command line in a Terminal). If you are running Webots for the first time on this computer, you may be prompted to select a graphical theme. You may also be invited to follow the Webots guided tour, go ahead and close the guided tour.
If you never saw it, please take some time to view the demos featured in the guided tour. They are telling a lot about the possibilities of Webots. The guided tour is also available from the Help menu of Webots.
A World is a file containing information like where the objects are, what they look like, how they interact with each other, what is the color of the sky, and the definitions of gravity, friction, masses of the objects, etc. It defines the initial state of a simulation. The different objects are called Nodes and are organized hierarchically in a Scene Tree. Therefore, a node may contain sub-nodes. A world is stored in a file having the .wbt extension. The file format is derived from the VRML97 language, and is human readable. The world files must be stored directly in a directory called worlds.
這裡所謂的 World 是一個文件檔案, 其中包含物件所在位置、外觀、以及如何與環境及其他物件進行相互作用、天空的顏色與重力、摩擦力、物件質量等資訊. 此外, 文件中還定義了模擬的初始狀態.
模擬場景中的各個物件稱為節點, 採樹狀架構排列. 其中的節點可以包含子節點. 模擬場景的檔案副檔名為 .wbt, 也就是 webots 中取 wbt 三個字母所組成. 該文件格式源自 VRML97 語言, 內容為明碼, 可以直接由文字編輯器讀取或編輯. 模擬場景檔案則規定必須儲存在名稱為 worlds 的目錄中.
Hands-on #2: Pause the current simulation by clicking on the Pause button  of the 3D view (see the user interface description to find out the buttons). The simulation is paused if the virtual time counter on the main toolbar is stopped. Create a new project from the File / New / New Project Directory... menu item and follow the instructions:
- Name the project directory
my_first_simulation instead of the proposed my_project.
- Name the world file
my_first_simulation.wbt instead of the proposed empty.wbt.
- Click all the tick boxes, including the "Add a rectangle arena" which is not ticked by default.
Webots displays a list of directories and files it just created. This corresponds to the standard file hierarchy of a Webots project. Click on the Finish (Windows, Linux) or Done (macOS) button to close this window.
Congratulations, you just created your very first Webots world! The 3D view should display a square arena with a checkered floor. You can move the viewpoint in the 3D view using the mouse: left button, right button and the wheel.
Webots nodes stored in world files are organized in a tree structure called the scene tree. The scene tree can be viewed in two sub-windows of the main window: the 3D view (at the center of the main window) is the 3D representation of the scene tree and the scene tree view (on the left) is the hierarchical representation of the scene tree. The scene tree view is where the nodes and fields can be modified. It should currently list the following nodes:
- WorldInfo: contains global parameters of the simulation.
- Viewpoint: defines the main viewpoint camera parameters.
- TexturedBackground: defines the background of the scene (you should see mountains far away if you rotate a little bit the viewpoint)
- TexturedBackgroundLight: defines the light associated with the above background.
- RectangleArena: define the only object you see so far in this scene.
Each node has some customizable properties called Fields. Let's modify these fields to change the rectangle arena:
每一個節點都帶有可以自行設定的屬性稱為欄位.
Hands-on #3: Double-click on the RectangleArena node in the scene tree. This should open the node and display its fields. (雙點擊各節點可以帶出其特定的欄位)
- Select the
floorTileSize field and set its value to 0.25 0.25 instead of 0.5 0.5. You should see the effect immediately in the 3D view.
- Select the
wallHeight field and change its value to 0.05 instead of 0.1. The wall of the arena should now be lower.
In the scene tree view, the fields are displayed in a different color (depending on the theme) if they differ from their default values. Now, we would like to add some objects:
當欄位值與其內定值不同時, 將以不同的顏色進行標示.
按下 shift+滑鼠左鍵, 可以移動物件.
選擇物件後, 可以用 Ctrl + C 複製該物件, 然後以 Ctrl + V 貼上該複製的物件, 然後再利用 Ctrl + 滑鼠左鍵移動物件.
選擇物件後, 出現位於物件中心點的座標向量與旋轉標示, 可以用滑鼠點選後可以利用向量進行單一方向的移動或利用旋轉標示旋轉物件.
Hands-on #4: Double-click on the RectangleArena in the scene tree to close it and select it. Click on the Add button  at the top of the scene tree. In the open dialog box, choose
 PROTO nodes (Webots Projects) / objects / factory / containers / WoodenBox (Solid). A big box should appear in the middle of the arena. Double-click on it in the scene tree to open its fields.
- Change its
size to 0.1 0.1 0.1 instead of 0.6 0.6 0.6.
- Change its
translation to 0 0 0.05 instead of 0 0 0.3. Alternatively, you may use the blue arrow that appears in the 3D view to adjust its translation.z field.
- Now shift-click and drag the box in the 3D view and move it in some corner of the arena.
- Select the box and press ctrl-C, ctrl-V (Windows, Linux) or ⌘ command-C, ⌘ command-V (macOS) to copy and paste it. Shift-click and drag the new box to move it at some different location. Create a third box this way.
- Move the boxes, so that no box is at the center of the arena. You may also use the blue rotation arrows to rotate the boxes along the vertical axis. This can be done also by shift-click and drag with the right mouse button. Alternatively, you can change the angle of the
rotation field of the WoodenBox nodes in the scene tree.
- Once you are satisfied with the result, save the world using the save button.
Using the translation and rotation handles to move objects is explained in this section.
The e-puck is a small robot having differential wheels, 10 LEDs, and several sensors including 8 DistanceSensors and a Camera. In this tutorial we are only interested in using its wheels. We will learn how to use other capabilities in the next tutorials.
Now, we are going to add an e-puck model to the world. Make sure that the simulation is paused and that the virtual time elapsed is 0. If this is not the case, reset the simulation with the Reset button  .
.
When a Webots world is modified with the intention of being saved, it is fundamental that the simulation is first paused and reloaded to its initial state, i.e. the virtual time counter on the main toolbar should show 0:00:00:000. Otherwise at each save, the position of each 3D object can accumulate errors. Therefore, any modification of the world should be performed in that order: pause, reset, modify and save the simulation.
We don't need to create the e-puck robot from scratch, we will just have to import a E-puck node. This node is actually a PROTO node, like the RectangleArena or the WoodenBox we introduced before. Prototyping allows you to create custom objects and to reuse them.
Hands-on #5: Select the last node WoodenBox of the scene tree view. Click on the Add button at the top of the scene tree view. In the dialog box, choose PROTO nodes (Webots Projects) / robots / gctronic / e-puck / E-puck (Robot). An e-puck robot should appear in the middle of the arena. Move and rotate this robot, the same way you did it with the boxes. Save the simulation and press the Run real-time button  .
.
The robot should move, blink LEDs and avoid obstacles. That's because it has a default controller with that behavior. You may have noticed a small black window appearing in the upper-left corner of the 3D view. It shows the image taken by the Camera of the e-puck robot. This image will remain black until the camera is explicitly enabled by the controller of the robot. This small image window can be moved around by dragging it. It can also be resized by dragging the bottom-right corner. Finally, it can be closed by clicking the "x" in the top-right corner. You can make it visible again from the Overlays menu, by selecting it in the Camera Devices submenu. Because we won't need it, you can actually close it.
Now, while the simulation is running, let's play with the physics:
Hands-on #6: Apply a force to the robot by pressing alt + left-click + drag (use the ⌥ option key on some Mac keyboards). On Linux, you should also press the ctrl key in addition to alt + left-click + drag. It is not possible to apply a force to a WoodenBox node, because by default, they have no mass and are considered as glued on the floor. To enable physics on the WoodenBox nodes, you should set their mass field to a certain value (for example 0.2 kg). Once this is done, should be able to apply a force on them as well.
The simulation may be paused , run step-by-step  , in real time or in fast
  modes.
Now we are going to modify the world and decrease the step of the physics simulation: this will increase the accuracy and stability of the simulation (but reduce the maximum simulation speed).
Hands-on #7: Pause the simulation and revert it. In the Scene Tree view, expand the WorldInfo node (the first node). Set its basicTimeStep field to 16. Then save the simulation.
We will now program a simple controller that will just make the robot move forwards.
A controller is a program that defines the behavior of a robot. Webots controllers can be written in the following programming languages: C, C++, Java, Python, MATLAB, etc. C, C++ and Java controllers need to be compiled before they can be run as robot controllers. Python and MATLAB controllers are interpreted languages so they will run without being compiled. In this tutorial, we are going to use C as a reference language but all the code snippets are also available in C++, Java, Python and MATLAB. Refer to the language chapter to setup a controller using a different programming language.
The controller field of a Robot node specifies which controller is currently associated to the robot. Note that the same controller can be used by several robots, but a robot can only use one controller at a time. Each controller is executed in a separate child process usually spawned by Webots. Because they are independent processes, controllers don't share the same address space, and may run on different processor cores.
Hands-on #8: Create a new C (or any other language) controller called epuck_go_forward (for C++ and Java call it EPuckGoForward instead) using the File / New / New Robot Controller... menu item. This will create a new epuck_go_forward (or EPuckGoForward) directory in my_first_simulation/controllers. Select the option offering you to open the source file in the text editor.
The new source file is displayed in Webots text editor window. This source file may be compiled (if written in C, C++ or Java) without any modification, however the current code has no real effect. We will now associate new epuck_go_forward (or EPuckGoForward) controller to the E-puck node.
Hands on #9: In the scene tree view, select the controller field of the E-puck node, then use the field editor at the bottom of the Scene Tree view: press the Select... button and then select epuck_go_forward in the list. Once the controller is associated with the robot, save the world. Modify the program by getting the motor devices (leftMotor = robot.getDevice('left wheel motor')), and by applying a motor command (leftMotor.setPosition(10.0)):
from controller import Robot, Motor

TIME_STEP = 64

# create the Robot instance.
robot = Robot()

# get the motor devices
leftMotor = robot.getDevice('left wheel motor')
rightMotor = robot.getDevice('right wheel motor')
# set the target position of the motors
leftMotor.setPosition(10.0)
rightMotor.setPosition(10.0)

while robot.step(TIME_STEP) != -1:
   pass
Save the modified source code (File / Save Text File), reset and run the simulation.
If everything is fine, your robot should move forwards. The robot will move using its maximum speed for a while and then stop once the wheels have rotated of 10 radians.
In the controllers directory of your project, a directory containing the epuck_go_forward (or EPuckGoForward) controller has been created. The epuck_go_forward (or EPuckGoForward) directory contains a epuck_go_forward (or EPuckGoForward) binary file generated after the compilation of the controller (on Windows, this file has the .exe extension). The controller directory name should match with the binary name.
The robots wheels are often controlled using velocity, and not position like we did in the previous example. In order to control the motors of the wheels in speed you need to set the target position to the infinity and to set the desired speed:
Hands-on #10: Modify the controller program as shown below, recompile it and run it:
from controller import Robot, Motor

TIME_STEP = 64

MAX_SPEED = 6.28

# create the Robot instance.
robot = Robot()

# get a handler to the motors and set target position to infinity (speed control)
leftMotor = robot.getDevice('left wheel motor')
rightMotor = robot.getDevice('right wheel motor')
leftMotor.setPosition(float('inf'))
rightMotor.setPosition(float('inf'))

# set up the motor speeds at 10% of the MAX_SPEED.
leftMotor.setVelocity(0.1 * MAX_SPEED)
rightMotor.setVelocity(0.1 * MAX_SPEED)

while robot.step(TIME_STEP) != -1:
   pass
The robot will now move (the wheels will rotate at a speed of 0.2 radian per second) and never stop. If nothing happens, don't forget to compile your code by selecting the Build / Build menu item or clicking on the gear icon  above the code area. Compilation errors are displayed in red in the console. If there are any, fix them and retry to compile. Then, reload the world.
We hope you enjoyed creating your first Webots simulation. You have been able to set up a world, add a robot and program it. The important thing is that you learned the fundamental concepts summarized below:
- A world is made up of nodes organized in a tree structure.
- A world is saved in a
.wbt file stored in a Webots project.
- The project also contains the robot controller programs which define the behavior of the robots.
- Controllers may be written in C or other languages.
- C, C++ and Java controllers have to be explicitly compiled before they can be executed.
- Controllers are associated with robots via the
controller fields of the Robot node.
HW1 <<
Previous Next >> HW2